Each one of the tutorials is designed to show a particular aspect of the norn
brain so they tend to be very simple. A reasonable knowledge of norn genetics
is generally assumed. The examples given use the Cyberlife Genetics Kit available
for purchase from the Cyberlife
Creatures site. Other third party tools may be able to be used. All genetic
modifications are made to one of the original Cyberlife norns using the dad1.gen
genetic file. Any genetic file should be useable for these examples though.
Overview
A norn brain lobe is composed of a number of cells that sit within the 64x48
grid of a norns brain. If you look at the current lobes for one of the original
Cyberlife norns you will see something like the following:
Number
Name
X
Y
Width
Height
Neurones
0
Perception
4
13
7
16
112
1
Drive
34
30
8
2
16
2
Source
15
24
8
5
40
3
Verb
37
24
8
2
16
4
Noun
21
3
20
2
40
5
General Sense
32
34
8
4
32
6
Decision
53
15
1
16
16
7
Attention
44
30
5
8
40
8
Concept
12
6
40
16
640
The total size of the brain is a grid of 64x48 cells or neurones. Each lobe
must be located somewhere within this grid. For example, the verb lobe is located
at position (37,24), is 8 cells wide and 2 cells high for a total size of 16
cells.
Each cell or neurone (I use the words interchangeably throughout the tutorials)
represents a piece of information or data that the lobe can process or act upon.
In the standard lobes each cell performs a particular function. Using the Verb
lobe as an example each cell maps to a particular verb (push, pull, etc) for
the norn. The full table for the verb lobe is:
Cell
X
Y
Description
0
37
24
Stay
1
38
24
Push
2
39
24
Pull
3
40
24
Stop
4
41
24
Come
5
42
24
Run
6
43
24
Get
7
44
24
Drop
8
37
25
Think
9
38
25
Sleep
10
39
25
Left
11
40
25
Right
12
41
25
Not Allocated
13
42
25
Not Allocated
14
43
25
Not Allocated
15
44
25
Not Allocated
A description of how I found out the relationships between the grid position
and the cells of the verb lobe.
Cells
Each cell has a number of attributes associated with it. For now we will only
be concerned with two of them. These are the 'State' and the 'Output'.
Imagine a cell of a lobe as being a box that holds an integer value between
0 and 255. A value of 0 means the cell is dormant or currently inactive. A value
of 255 means the cell has fired to its maximum level. So the value of the cell
indicates how strongly the cell was fired.
When a cell is fired it gets set to a particular value. This value is known
as the 'state' of the cell. A number of times every second (about 4?) Creatures
goes through all cells of every lobe for every norn and calculates the 'Output'
value of the cell. The output value indicates the current level of activity
for the cell. So what is the difference between state and output? State is the
stored value of the cell. Output is calculated from the State and indicates
the current level of activity. Once the output is computed the value of the
State is set to the value of the Output. For example:
We have a cell with Output set to 0 and State set to 255.
A number of times per second (hereafter called a 'clock tick') Creatures
will apply a calculation to State and store the result in Output. (So Output
could now be 200, State is still 255).
At the beginning of the next clock tick Creatures will move the Output into
State, apply the calculation to State and store the result in Output again
(So Output could now be 100, State would be 200).
This continues until State is zero.
This is how I think it works and observation using LobeStudy seems to show
it.
What is the calculation that is applied to State to get the Output? This is
a combination of a leakage rate and an SVRule. We will deal with the SVRule
in the next tutorial so for now we will deal with the other Cell options.
In the Genetics Kit there are a number of values that can be set for a cell
listed in the 'Cell Body' tab under 'Cell Body Dynamics'. They are:
Nominal Threshold
This is a number with a value from 0 through to 255. When the state is set
for a cell it will not fire (ie. have its Output value set) unless the value
of State is greater than this threshold.
Leakage Rate
This defines the speed at which the State will drop from its current value
to its rest state. It has values like 'Instantly', '5 Seconds', '10 Seconds',
right through to '52 Years'.
Rest State
This is the resting state of the cell. That is, if the cell has not been
fired or activated it will sit on the value set here. The value is from 0
through to 255.
Input gain lo-hi
I have no idea what this is. Can anyone help me on this one?
To demonstrate the effects of the above settings we will create a norn with
an extra brain lobe. This lobe will contain one cell. At various stages of the
tutorial we will set the cell body dynamics to different values to demonstrate
the effect. The results will be viewed using BrainCellMonitor.
Example 1
The .gen file and a norn exported with this genome is available in example1.zip.
This should enable you to try some of this example out even if you don't have
the genetics kit. In that case start from step 8 after importing the norn from
the zip file.
Run the genetics kit and load the genetic file dad1.gen (you can use any
file but this is the one I used putting this together).
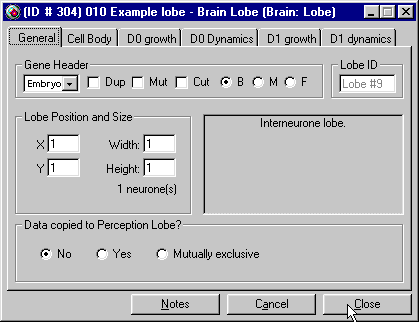
Create a new Brain Lobe gene. I gave it the name 'Example 1 lobe'.
The brain lobe dialog box should appear showing the lobe number as lobe
#9. The only things you need to change on this 'General' tab are the (X, Y,
Width, Height) to (1, 1, 1, 1) respectively. This creates a lobe at position
(1,1) on the Brain grid (which is unused) and it has a size of 1 neurone.
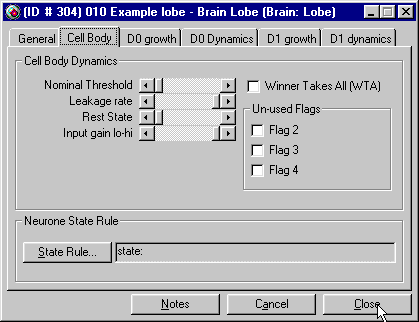
Under the 'Cell Body' tab make sure the following settings are made:
Nominal Threshold
0 - slider all the way to the left
Leakage Rate
0 - Instant - Slider all the way to the right
Rest State
0 - slider all the way to the left
Input gain lo-hi
255 - slider all the way to the right
Set the 'Neurone State Rule' to be 'State:End'. This ensures that the only
change to state occurs through the leakage rate setting.
This gives us a brain lobe with one cell that fires whenever the state is
above zero, and will immediately go back to a zero state after firing. Close
the dialog box and save the genome as example1.gen.
Make sure Creatures is running and use the 'Lay Egg' option of the genetics
kit to insert an egg with this genetic file into the game.
Hatch the egg.
You should now have a norn in the world with an extra brain lobe.
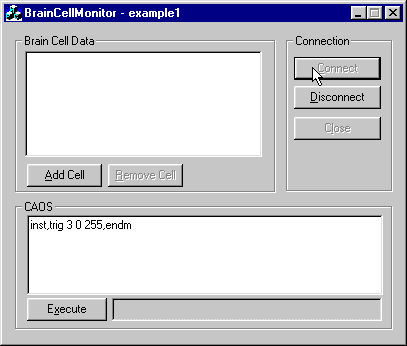
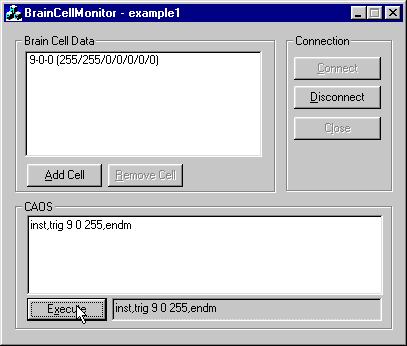
Run the BrainCellMonitor program and press the 'Connect' button. The title
of the program should indicate the name of the selected norn in creatures.
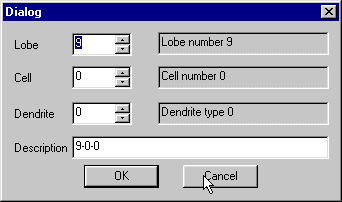
Press 'Add Cell' and set the values to 'Lobe 9', 'Cell 0', 'Dendrite 0'
and choose 'Ok'.
You should now see the data for this brain cell appearing in the list box
and updating every half second or so. Everything should be zero.
In the 'CAOS' edit area, enter the following CAOS command: inst,trig
9 0 255,endm
Press the 'Execute' button. This will cause lobe 9, cell 0 to fire at its
maximum value.
You should see the first two numbers in brackets in the list box change
to (255/255/...). This is the ouput and state values respectively. They both
drop almost immediately to zero as the leakage rate was set to 'Instant'.
Enter the following CAOS command: inst,fire 1 1 255,endm
Press the 'Execute' button. This will cause cell (1,1) in the brain grid
to fire. ie. The same cell.
You should now see only the state change to 255. The output will be zero.
This is the difference between the 'trig' and the 'fire' commands. 'trig'
also sets the output to the initial value whereas 'fire' does not.
Press Disconnect. Close BrainCellMonitor.
Remember that this is an actual functioning brain lobe that we have created
that we can fire and view the results. It is not connected in any manner to
any of the other lobes so it will have no affect whatsoever on the norn. We
need to wire it up in some manner to other brain lobes for this to happen.
We will cover this in a later tutorial.
Export the norn from Creatures and we'll try another one in Example 2.
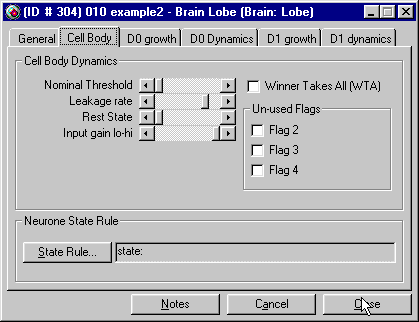
Example 2
The .gen file and a norn exported with this genome is available in example2.zip.
Modify the genome from example 1 above to have the following values:
Nominal Threshold
0 - slider all the way to the left
Leakage Rate
48 - Approximately 20 seconds.
Rest State
0 - slider all the way to the left
Input gain lo-hi
255 - slider all the way to the right
The state rule should still be 'State:end'.
Perform the same steps as above to view and fire the cell.
Notice that when using the 'trig' and 'fire' command the state and output
now slowly count down to zero. This is the leakage rate in operation. It is
slowly adjusting the state down to its rest state according to the time set
in leakage rate.
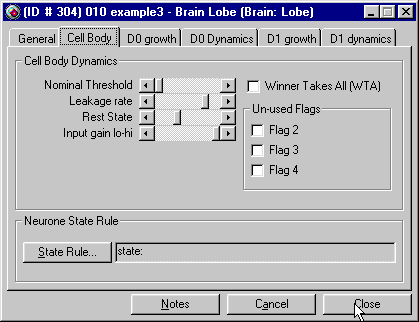
Example 3
The .gen file and a norn exported with this genome is available in example3.zip.
Modify the genome from example 2 above to have the following values:
Nominal Threshold
0 - slider all the way to the left
Leakage Rate
48 - Approximately 20 seconds.
Rest State
80
Input gain lo-hi
255 - slider all the way to the right
The state rule should still be 'State:end'.
Notice that the State and Output of the cell is now always 80. This is the
rest state we set above.
Now perform the same steps as above to view and fire the cell.
Notice that when using the 'trig' and 'fire' command the state and output
now slowly count down to 80 this time. They also count down in smaller increments
as they don't have to get to zero. They only have to get to our rest state.
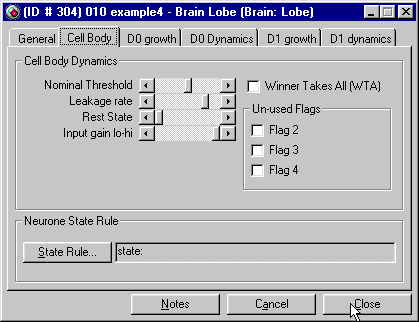
Example 4
The .gen file and a norn exported with this genome is available in example4.zip.
Modify the genome from example 3 above to have the following values:
Nominal Threshold
128
Leakage Rate
48 - Approximately 20 seconds.
Rest State
0 - slider all the way to the left
Input gain lo-hi
255 - slider all the way to the right
The state rule should still be 'State:end'. Now we are saying that the output
should only be set if the State is above 128.
Now perform the same steps as above to view and fire the cell.
Notice that when the state value drops below 128 (our nominal threshold)
then the output hits zero immediately. The cell is no longer 'firing' at this
point.
If we fire or trig the cell with a value less than 128 see what happens
(change the '255' in the CAOS command to '100'). In the case of 'fire' the
output never rises above zero as the state is always less than 128. This means
the cell never actually fired. In the case of 'trig' the output hits '100'
then drops immediately to zero. So 'trig' will always fire the cell at least
once.
This completes Tutorial One. I hope you found it interesting. It provides a
background to general lobe and cell function. Tutorial Two will describe SVRules
in more detail and introduce the concept of dendrites and linked lobes. Tutorial
Three will create our first lobe that performs activity without our own interaction.
ie. It will interact with the environment in some manner. Tutorial Four will
provide our first functioning useful lobe.