| Home | New Tutorials | Programs | ||
|---|---|---|---|---|
| 1-R4DS Setup | 2-Software | Space Invaders | ||
| Old Tutorials | DSEmu | |||
| 1-Setup | 4-Sound | 7-FIFO | ||
| 2-Framebuffer | 5-SRAM | 8-Interrupts | ||
| 3-Keys | 6-Filesystems | 9-Microphone | ||
| 10-Extended Rotation Background | ||||
This tutorial was tested and works with libnds dated 2005-10-18. Unfortunately it no longer works with libnds dated 2005-12-12. I'm looking into it.
In most of the graphics examples so far I've been using the framebuffer graphics mode. This mode is simple to use but has a few disadvantages. One of which is that only one screen can use the framebuffer mode. If you want to display similar graphics on both screens you can't use the framebuffer. This tutorial will show how we can work around this problem using a different mode. The demo application will display jpeg files using a mode 5 extended rotation background.
An extended rotation background is effectively a bitmap that can be displayed on the screen. The bitmap may be larger than the physical size of the screen so only a portion of it may be displayed at any point in time.
These types of backgrounds have hardware scrolling so that by changing a couple of registers a different portion of the bitmap can be displayed on the screen without writing any additional code. Extended rotation backgrounds can also do hardware scaling, rotating and shearing.
The bitmap can be written to in a similar manner to the way we wrote to the framebuffer and the result is immediately displayed on the screen. With the extra capabilities and advantages of extended rotation backgrounds there seems to be no real need for the framebuffer mode since it requires little extra code but you gain many benefits.
There are a number of different graphic modes available on the Nintendo DS, each with different capabilities. Each mode has a number of 'backgrounds' that can be used.
A 'background' is a surface that when drawn upon, displays on the hardware. Modes that have multiple backgrounds allow these backgrounds to be overlayed so that they are drawn on top of each other. This enables a background with text to be overlayed on top of a background displaying an image for example.
The mode used in this tutorial is mode 5. According to the libnds documentation the backgrounds used in this mode are:
| Mode | Background | Description |
|---|---|---|
| 5 | 0 | text background. Can be used for 3D. |
| 5 | 1 | text. 2D only. |
| 5 | 2 | extended rotation background. |
| 5 | 3 | extended rotation background. |
Each background has a number of registers that can be used to control different aspects of it. DStek describes these in great detail.
To set the mode to mode 5, and define what backgrounds we are using, we use the 'videoSetMode' call for the main screen:
  videoSetMode(MODE_5_2D | DISPLAY_BG2_ACTIVE);
  vramSetBankA(VRAM_A_MAIN_BG_0x6000000);
  BG2_CR = BG_BMP16_256x256;

  // Set translations
  BG2_XDX = scale_settings[scale];
  BG2_XDY = 0;
  BG2_YDX = 0;
  BG2_YDY = scale_settings[scale];
  BG2_CY = 0;
  BG2_CX = 0;
When the DS displays data on the screen, depending on what mode is active, it will display pixel data located at certain memory addresses so that they will appear on the screen. The actual memory address depends upon the mode being used whether it is the main or sub screen.
For example, the framebuffer mode will render pixels from memory address 0x06800000 onwards. That is why in the framebuffer tutorial all writes are done to location VRAM_A which is defined to be 0x06800000 in libnds.
By default though there is no actual memory that can be read or written to in the 0x06000000-0x06FFFFFF memory range. You need to map video ram into this area, which brings us to the subject of VRAM memory banks.
The DS has nine banks of video memory, labelled VRAM_A through to VRAM_I. Each bank can be mapped to a particular memory area for use in displaying bitmaps, sprites, tiles, etc.
Each of these has a particular size and are best suited for different purposes. The banks and their sizes are:
| Bank | Control Register | Size |
|---|---|---|
| VRAM_A | VRAM_A_CR | 128 Kilobytes |
| VRAM_B | VRAM_B_CR | 128 Kilobytes |
| VRAM_C | VRAM_C_CR | 128 Kilobytes |
| VRAM_D | VRAM_D_CR | 128 Kilobytes |
| VRAM_E | VRAM_E_CR | 64 Kilobytes |
| VRAM_F | VRAM_F_CR | 16 Kilobytes |
| VRAM_G | VRAM_G_CR | 16 Kilobytes |
| VRAM_H | VRAM_H_CR | 32 Kilobytes |
| VRAM_I | VRAM_I_CR | 16 Kilobytes |
In the framebuffer tutorial we mapped VRAM_A to memory location 0x06800000 using the following line of code:
vramSetBankA(VRAM_A_LCD);
Under the covers, libnds does the following:
VRAM_A_CR = VRAM_ENABLE | VRAM_A_LCD;
The 'VRAM_A_LCD' is a bitmask that tells the control register to map the given VRAM memory bank to location 0x06800000. The actual bitmap values and what memory areas they map the VRAM to is available at DStek.
You must ensure that you map the right amount of video memory to the correct memory address for the mode and backgrounds that you are using. In the extended background rotation mode for the main screen, memory address 0x06000000 is used for displaying the information on the screen. We need to map a VRAM bank to this memory area and it needs to be large enough for the background bitmap we want to display.
The bitmap used for displaying the background can be 16-bit or 8-bit with a number of different sizes. The options for 16 bit bitmaps are:
| Define | Description |
|---|---|
| BG_BMP16_128x128 | 16 bit 128x128 |
| BG_BMP16_256x256 | 16 bit 256x256 |
| BG_BMP16_512x256 | 16 bit 512x256 |
| BG_BMP16_512x512 | 16 bit 512x512 |
This size must be assigned to the control register for the background. In our demo we are using mode 5. In this mode only backgrounds 2 and 3 can be extended rotation backgrounds. To set the bitmap size of background 2 we use:
  videoSetMode(MODE_5_2D | DISPLAY_BG2_ACTIVE);
  vramSetBankA(VRAM_A_MAIN_BG_0x6000000);
  BG2_CR = BG_BMP16_256x256;

  // Set translations
  BG2_XDX = scale_settings[scale];
  BG2_XDY = 0;
  BG2_YDX = 0;
  BG2_YDY = scale_settings[scale];
  BG2_CY = 0;
  BG2_CX = 0;
In this case a 16 bit bitmap is used so we can write to it using a similar method to the way we wrote to the framebuffer. The size we are using is 256x256 which is larger than the DS screen (which is 256x192) so we can demonstrate scrolling around an image.
A 16 bit 256x256 image requires 128 kilobytes to store the image. We need to map enough VRAM to memory address 0x06000000 to display an image of this size. This can be done with VRAM banks A-D as they are all 128 kilobytes in size. Our demo uses VRAM_A:
  videoSetMode(MODE_5_2D | DISPLAY_BG2_ACTIVE);
  vramSetBankA(VRAM_A_MAIN_BG_0x6000000);
  BG2_CR = BG_BMP16_256x256;

  // Set translations
  BG2_XDX = scale_settings[scale];
  BG2_XDY = 0;
  BG2_YDX = 0;
  BG2_YDY = scale_settings[scale];
  BG2_CY = 0;
  BG2_CX = 0;
With this VRAM bank mapped,any write to 0x06000000 through to 0x06020000 will be stored in the first VRAM bank. This memory area can now be written and which results in it being displayed directly on the screen. Extended rotation backgrounds need a little more setup though to some background control registers to set up scaling, etc.
Two registers per background control hardware scaling. They are BGx_XDX and BGx_YDY (replace 'x' with the number of the background you are using). These are 16 bit registers that hold a scaling factor for the X and Y direction respectively. Bits 0-7 of the register control fractional scaling (ie. numbers less than 1) and bits 8-15 control factors 1 and greater.
These registers must be set for an image to display properly in extended rotation backgrounds. The default value of '0' will scale the image down to nothing. To set the scale factor to use a scaling factor of 1 use:
  BG2_XDX = 1<<8;
  BG2_YDY = 1<<8;;
Remember that bits 8-15 control factors 1 and greater so 1 shifted left 8 times results in a scaling factor of 1. The demo uses a lookup table of scaling factors to allow the user to select predeterimined scales:
  videoSetMode(MODE_5_2D | DISPLAY_BG2_ACTIVE);
  vramSetBankA(VRAM_A_MAIN_BG_0x6000000);
  BG2_CR = BG_BMP16_256x256;

  // Set translations
  BG2_XDX = scale_settings[scale];
  BG2_XDY = 0;
  BG2_YDX = 0;
  BG2_YDY = scale_settings[scale];
  BG2_CY = 0;
  BG2_CX = 0;
The registers for scaling are actually a little more complicated. There are four registers that together control scaling, rotating and shearing. They are BGx_XDX, BGx_XDY, BGx_YDX and BGx_YDY. Together these four registers define a matrix that is used for transforming pixels. I won't be going into detail on this in this tutorial but to enable no scaling, shearing and rotating, the scaling registers need to be set as mentioned previously and the other two set to zero:
  videoSetMode(MODE_5_2D | DISPLAY_BG2_ACTIVE);
  vramSetBankA(VRAM_A_MAIN_BG_0x6000000);
  BG2_CR = BG_BMP16_256x256;

  // Set translations
  BG2_XDX = 1<<8;
  BG2_XDY = 0;
  BG2_YDX = 0;
  BG2_YDY = 1<<8;
  BG2_CY = 0;
  BG2_CX = 0;
Failing to set these correctly will result in your background not displaying correctly. For details on the matrix as it relates to the Gameboy Advance, see this GBA tutorial on the affine transformation matrix.
Two final registers need to be set. These control where the upper left origin of the screen maps to on the target bitmap. They are BGx_CX and BGx_CY. By manipulating these registers you can immediately scroll the image displayed without any need to copy memory around. Our demo sets these to zero initially to display the top left of the bitmap:
  videoSetMode(MODE_5_2D | DISPLAY_BG2_ACTIVE);
  vramSetBankA(VRAM_A_MAIN_BG_0x6000000);
  BG2_CR = BG_BMP16_256x256;

  // Set translations
  BG2_XDX = scale_settings[scale];
  BG2_XDY = 0;
  BG2_YDX = 0;
  BG2_YDY = scale_settings[scale];
  BG2_CY = 0;
  BG2_CX = 0;
Once the VRAM is mapped and the background registers for translation, shearing, etc are set then data can be drawn by setting the pixels to 16bit color values. You'll recall a function from the framebuffer tutorial to draw a shape similar to this:
void draw_shape(int x, int y, uint16* buffer)
{
  buffer += y * SCREEN_WIDTH + x;
  for(int i = 0; i < shape_height; ++i) {
    uint16* line = buffer + (SCREEN_WIDTH * i);
    for(int j = 0; j < shape_width; ++j) {
      *line++ = RGB15(31, 0, 0);
    }
  }
}
This code can be modified easily to draw to the extended rotation bitmap. Firstly we no longer use SCREEN_WIDTH and SCREEN_HEIGHT. Instead the bitmap we are using is 256x256 so that will need to be changed. The other factor with extended rotation backgrounds is the 16-bit color data must have bit 15 set. Without it nothing will display. So the new function becomes:
void draw_shape(int x, int y, uint16* buffer)
{
  buffer += y * 256 + x;
  for(int i = 0; i < shape_height; ++i) {
    uint16* line = buffer + (256 * i);
    for(int j = 0; j < shape_width; ++j) {
      *line++ = RGB15(31, 0, 0) | BIT(15);
    }
  }
}
This demo program will display JPEG images. To do the JPEG decoding I used a GBA JPEG decoder library written by Burton Radons, and modified to compile on the DS by 'headspin'. The code for this library is in gba-jpeg.h, gba-jpeg-decode.h, and gba-jpeg-decode.c. The archive can be downloaded from headspins site.
The basic use is to include the header files for the library and call 'JPEG_DecompressImage' to decompress the JPEG data to an area of memory:
// Decode the jpeg file with the given name to the VRAM location
// specified.  The height and width are the height and width of the
// output bitmap.
void BltImage(char* name, u16* vram, int output_width, int output_height)
{
  WAIT_CR &= ~0x80;
  GBFS_FILE const* gbfs_file =
    find_first_gbfs_file((void*)0x08000000);
  uint8* image = (uint8*)gbfs_get_obj(gbfs_file,
				      name,
				      0);
  JPEG_DecompressImage(image, vram, output_width, output_height);

  WAIT_CR |= 0x80;
}
The image data is stored in a GBFS file archive in almost exactly the same way as the sound data was handled in the filesystem tutorial. This demo program uses four simple images:
| Image | Size | Description |
|---|---|---|
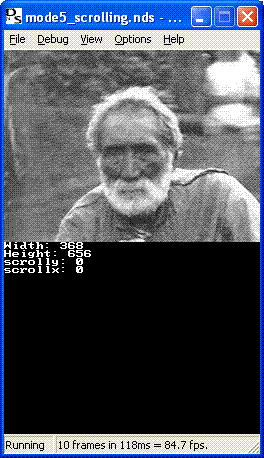
| duddie.jpg | 368x656 | Thursday October Christian the second, grandson of Fletcher Christian who mutineered against William Bligh on HMAV Bounty. Also my great, great, great, great, Grandfather, born October 1820 on Pitcairn Island. |
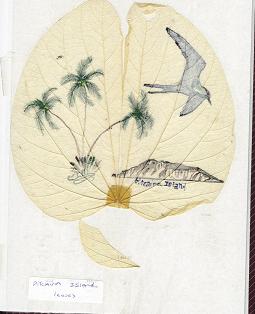
| pitcairn_leaf.jpg | 255x314 | A traditional Pitcairn Island leaf painting. |
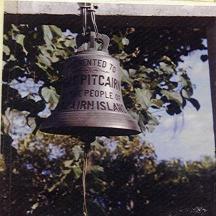
| bell.jpg | 216x216 | The 'Pitcairn Bell' on Pitcairn Island. |
| brave_bird.jpg | 254x191 | My flatmates cat Snowy, eyeing up her bird, Loki. |
These images are stored in a GBFS archive and when the user selects the image to be displayed it is copied from the GBA flash cartridge to VRAM:
// Decode the jpeg file with the given name to the VRAM location
// specified.  The height and width are the height and width of the
// output bitmap.
void BltImage(char* name, u16* vram, int output_width, int output_height)
{
  WAIT_CR &= ~0x80;
  GBFS_FILE const* gbfs_file =
    find_first_gbfs_file((void*)0x08000000);
  uint8* image = (uint8*)gbfs_get_obj(gbfs_file,
				      name,
				      0);
  JPEG_DecompressImage(image, vram, output_width, output_height);

  WAIT_CR |= 0x80;
}

int main()
{
    [...]
    if(keysDown() & KEY_SELECT) {
      current_image++;
      if(current_image >= image_count)
	current_image = 0;
      memset(BG_GFX, 0, 256*256*2);
      BltImage(images[current_image], BG_GFX, 256, 256);
      GetImageSize(images[current_image], &width, &height);
    }
    [...]
}
Notice the BG_GFX define that is used. This is defined to be memory location 0x06000000, which is the memory location that the hardware expects background bitmap image data to be for the main screen. Remember that we mapped VRAM_A to be located at this address. The size and width is set to the bitmaps 256x256 size.
Scrolling the image in the demo is done using the arrow keys. Pressing these keys causes an internal record of the current X and Y origin to be changed. This value is then left shifted 8 times and stored in the scrolling registers BG2_CY and BG2_CX. The left shift is required as you'll recall from the register section that bits 0-7 are fractional values while bits 8-15 are the whole number values:
static int scrolly = 0;
static int scrollx = 0;

int main()
{
    [...]
    if(keysHeld() & KEY_DOWN) {
      scrolly++;
      BG2_CY = (scrolly<<8);
    }
    if(keysHeld() & KEY_UP) {
      scrolly--;
      BG2_CY = (scrolly<<8);
    }
    if(keysHeld() & KEY_RIGHT) {
      scrollx++;
      BG2_CX = (scrollx<<8);
    }
    if(keysHeld() & KEY_LEFT) {
      scrollx--;
      BG2_CX = (scrollx<<8);
    }
    [...]
}
As soon as these registers are updated the new origin is set in the hardware and the new image portion will display. No memory copying required.
Pressing the A and B keys will change the scaling settings. I've hardcoded a number of scaling settings and A and B move up and down in this array:
static int scale_settings[] = {
  1 << 4,
  1 << 5,
  1 << 6,
  1 << 7,
  1 << 8,
  2 << 8,
  3 << 8,
  4 << 8,
  5 << 8,
  6 << 8,
  7 << 8,
  8 << 8,
  9 << 8,
  10 << 8
};

int main()
{
    [...]
    if(keysDown() & KEY_A) {
      scale++;
      if(scale >= scale_count)
	scale = scale_count - 1;
      BG2_XDX = scale_settings[scale];
      BG2_YDY = scale_settings[scale];
    }
    if(keysDown() & KEY_B) {
      scale--;
      if(scale < 1)
	scale = 1;
      BG2_XDX = scale_settings[scale];
      BG2_YDY = scale_settings[scale];
    }
    [...]
}
Like the scroll registers, assigning to these hardware registers will immediately scale the image. The scaling algortihm appears to be quite simple but it's done in hardware and is very fast.
The second screen is used in this demo to display some image information using the libnds console routines:
void on_irq()
{
  if(REG_IF & IRQ_VBLANK) {
    // Handle vertical blank interrupt
    printf("\x1b[2J");
    printf("Width: %d\n", width);
    printf("Height: %d\n", height);
    printf("scrolly: %d\n", scrolly);
    printf("scrollx: %d\n", scrollx);
    VBLANK_INTR_WAIT_FLAGS |= IRQ_VBLANK;
    REG_IF |= IRQ_VBLANK;
  }
  else {
    // Ignore all other interrupts
    REG_IF = REG_IF;
  }
}
The console is set up to use the second screen via the following code:
  // Setup console screen to display information about the jpeg.
  videoSetModeSub(MODE_0_2D | DISPLAY_BG0_ACTIVE);
  vramSetBankC(VRAM_C_SUB_BG);
  SUB_BG0_CR = BG_MAP_BASE(31);
  BG_PALETTE_SUB[255] = RGB15(31,31,31);
  consoleInitDefault((u16*)SCREEN_BASE_BLOCK_SUB(31), (u16*)CHAR_BASE_BLOCK_SUB(0), 16);
We've used console code like this before but it is changed slightly to use the 'SUB' defines and functions to go to the second screen. A future tutorial will go into detail about the second screen.
Use the arrow keys to scroll the image. Press A and B to scale it. Press select to change to one of the other images.
The complete example program is 'mode5_scrolling'. The ARM9 code is in arm9_main.cpp. The ARM7 code is in arm7_main.cpp. A Makefile file is supplied to build everything.
The complete source code, including images, is supplied in mode5_scrolling.zip and you can download the mode5_scrolling.nds and mode5_scrolling.nds.gba files for running on the emulators or hardware. DSEmu 0.4.5 and above will run this demo but the hardware scaling does not work quite right. All other aspects of the demo work fine. A screenshot of it running in DSEmu:
This tutorial has introduced mode 5 and the extended rotation background. There is much more to cover on backgrounds and graphics in general. I hope to have the upcoming tutorials focusing more on this area, including tiles and sprites.
Try playing around with this demo, adding new images, experimenting with the rotation, scaling, shearing, etc.
Copyright (c) 2005, Chris Double. All Rights Reserved.